
Star Lake, Topple
When you’re finished doing some subquests (I really can’t recommend this enough, ’cause not only will you gain levels, but gems, recovery items, armours and weapons from enemies… you’ll hardly need to shop, if at all, which at this point is a really good thing because you’re probably rather poor at the moment) and stocking up on any material if necessary, head for the upstairs balcony of the Silver Mermaid and talk to Moti there.
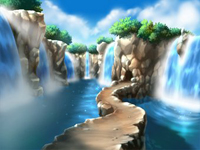
To get to your next mission, Moti will give you a Spin Drum, which was entrusted to him by the spirits to call upon the guardian spirit Flammie. You take this, go to the balcony, and spin it. One nice FMV sequence later, and you’ll be flying around over the Mana Village on top of Flammie. Click on the More button at the bottom of your screen to leave Illusia Isle and head for other lands, then go for the Star Lake on the Isle of Topple. Now we’ve landed and taken a nice long look at the lovely waterfall, time to enter the cave.
-1st Zone
Gleamdrop: Hidden in a chest
Gleamwell: ——–
Now at this point I’m going to give you a heads up on some new things to do within the level relating to item finding and general navigation. First off, the bushes in Star Lake often hide items and bags of money in them. To reveal them, charge up your flail as if to draw an object near, aim at the bush and see what happens. If there is an item, it will be brought out to you and picked up. If there isn’t, you’ll be pulled toward the bush. Also be careful of monsters hiding in the bushes.
The second thing is the small pink plants that appear to be substituting the barrels. You can push these around, and they will come in handy for the next type of plant, which is the grabbing grass. This grass will move in the wind, and when you step on it, will tangle you up for a few seconds, making you susceptible to attacks and stopping you from doing ANYTHING about it. You just have to keep running until it lets go. But, they are weak to being cut down when in this state, and also trap enemies and pink plants… So, either lure an enemy in, or push a pink plant on to them, then take one hack with your sword, and you can clear a path through.
You will also see some large vines blocking your way often enough, same as the big blue jars in the Mana Tower. These can be broken either by a falling enemy, or you’ll have to wait until you get a hammer later on.
That done and dusted, on with the level. You’ll get to practice all of the above here with little enemy hinderence, so try out your new skills and get used to how this level works. You’ll find the GleamDrop in the first chest you encounter to the left of where you start the level, so pick it up after defeating the nearby beasties and drop it further down the level as you go along, and keep doing this, leaving it behind until you’ve cleared yourself a path. This’ll save you going all the way back afterwards.
-2nd Zone
Gleamdrop: Hidden in a chest
Gleamwell: ——–
Now the fun begins, we see the return of the Mad Mallard. He packs a punch, so watch out. If you followed m advice on the subquests, you should AT LEAST be at level 10 by now. The Drop is in a chest on the far right hand side of the zone, but make sure you drop by the left hand side. There are three chests huddled together across to pits of spikes. To get across, use the Flail to hook on to the bushes in between and pull yourself along. There are also another two chests near the drop, at the bottom of the level. To get to these, push the nearest pick flower you find down and Sword Combo it into them to break them. A gem and money are in store. Another gem is located just above these on an island. Use your Flail to open the chest and pull the gem back.
This will be your first encounter with impure gems. If you’ve read the Gem Guide you’ll already know, but just in case, these gems grant powerful boosts but are unstable, and so will reduce other stats. Careful using them.
Once you’ve done some more exploring, take the drop to the pool
-3rd Zone
Gleamdrop: Hidden in a chest
Gleamwell: ——–
As if Tonpoles weren’t enough nostalgia for you, now you get Snap Dragons too. An they’ll gobble you up just like the old days, so proceed with caution. On your left there will be a golden chest behind a pit of spikes, guarded by two fake chests. Take these out with your flail to avoid any trouble from them.
At the top of this level there is a grouping of four, yes four, heavily guarded golden chests with some nice rewards in them. To get to them, push one of the pink plants up to the grabbing grass at the top right corner of the zone and hack own the grass, then use the same plant to kill knock down the vines. Do this twice, and prepare to kick some buttock to get at the golden booty.
You’ll find other passages with the same properties. Same technique applies. If you run out of pink flowers, you can always come back to the level again using the space-time distortion.
-4th Zone
Gleamdrop: Defeat a certain monster
Gleamwell: ——–
This one’s pretty simple, take out the enemies, and the slithery one will give you the drop. Make sure you check out everything in this room before moving on, you’ll be up for a challenge next..
– Boss Battle : Galem –
Now this one is an interesting boss battle, so get your equipment and gems up to speed with what you’ve found on your way. The beast is a huge bush, basically. You character will use the Holy Sword to strip away it’s protective aura.
The boss will launch his orbiting mini-bushes, and there is no way of hurting him. To get around this, you have to use a charged flail to pull the bushes away, defeat them, and once you’ve done them all attack the core. Careful when he glows, he will send out vines that rise from the ground and knock you out temporarily.
Once the mini bushes are defeated, start pummeling the centre, but watch out, he’ll regenerate the orbiters, and if you’re standing right next to him you will die almost imediatly from multiple hits.
Give him two or three rounds worth of beating and he should be yours.
The boss will again split in to two benevodons (Light and Wood) and disappear. In his place, the face of a tree will float in the air. He will introduce himself as Treant, patriarch of the trees. He explains that the power warping the world is not that of Mavolia, but of Mana. He doesn’t know why, but it’s surging out of control and may destroy the world. To avoid the world being torn apart, he entrusts you the task of quelling the Mana columns spurting over the world.
To help you, he will give you one of his branches, which will open the way to other places. You then make your way back to Moti’s place and give him and Tess the low-down. Moti will now give you a new weapon, the Short Bow. You can now attack enemies at a distance, and charm those nearby by charging and plucking the bowstring.
Now go and visit the Bomb Brothers. Balbo has just been given some ore which he’ll use to expand your gem frame. Now you have a 4×2 grid, meaning double the gem capacity you had before.
Your next course of action will be to talk to the villagers and find out some more details about recent incidents. But first, I’d suggest doing some more subquests to prepare yourself for the upcoming stages, they only get harder.
I’d recommend at this point that you get your level up to 19 or 20, and equip the weapons appropriate for said level. Gem-wise, taking in to account that I don’t use magic, I’ve decided to invest in a “Soul of the Gemma” and add that to my “Sword Training” gem. Other combinations you can try are things such as two “Berserking” with as much defense as you can fit in to compensate for the defense loss (if you don’t, you’re a sitting duck, and I cannot stress this enough, you WILL die VERY quickly). Also before questing too much, get rid of some of your duplicate items, and maybe even increase your knapsack to hold 12 of each, so you can stuff your bag full of even more goodies to sell later. You can’t sell things for much, but to be honest, this game really makes you save up the pennies, so you might as well. Otherwise, you’re going to find yourself revealing items that you can’t pick up because your inventory is full, which is a waste. I was able to pull together an extra 20000L pretty much this way on top of what I was getting from the quests themselves.
You’ll also notice in Moti’s place, right next to the fireplace, a shining object. It’s a Rusty Key. Take it over to Moti and he’ll reveal that it is the key to the haunted house, which is in fact where the village stores all its records, studies of the tree. He had indented to give it to you or Tess, but he misplaced it. He tells you to keep it. Now take it to the door of the haunted house, below his, and open the door. You’ll go in and have a rummage through the books in there, finally finding what looks like a Journal. It is entitled the Adventurer’s Log I. It talks of the adventurers quest into the Star Lake at Topple, and how he heard a dragon’s roar. He went to investigate and indeed found a dragon, which enquired whether he had come to be eaten. When he said he came to slay the dragon, it laughed and attacked. The adventurer vanquished the dragon with two slashes of his blade. Astonished you finish reading the tome, and Tess walks in. She reads the journal too, and asks if you’re planning on going to Topple. If you say yes you’ll take this on as a subquest.
Now with this extra money, and seeing as we’re going into Jadd, you may want to invest in getting one of the Elemental Friend Gems and fusing it with a Crystal of Thought. This will give you a gem, Virtue of Balance, that will allow you to walk on quicksand as if it were normal ground, and you’ll see as we go through that it can prove tremendously useful to access certain chests in the desert. You can of course always revisit the level later with the gem if you don’t want to invest in it now and would rather hack your way through the first time round. You’ll get the low-down of what the chests have ahead, so judge if you want the items or not.
Subquests available: A Valuable Watch (Millionaire), The Bomb Brother’s Discovery (Bomb Bros), The Dragon in the Journal (Tess, open Haunted House)


