
Author’s note: Before I receive any e-mails with accusations of plagiarism, the information on this page was painstakingly gathered by trial and error over the course of about 2-3 hours by yours truly, not copied from a FAQ that I found a couple of days later on GameFAQs. -Kassidy
The Debug Room for Seiken Densetsu 3 allows the player to access pretty much any major location in the game, and battle with any of the undefeated bosses with total freedom. Not only that, you can even view the endings for the characters in your party and play a whole slew of tunes from the soundtrack available via a music test. How’s that for a slice of fried gold?
You will, however, need one this before accessing it, and that is a Pro Action Replay/Game Genie for the SNES, reason being we will need to use a code to enable the debug room. You may want to use others also to be able to experiment more freely with it.
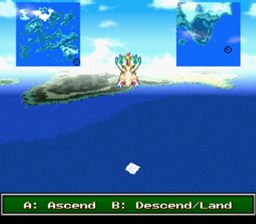
fig.a
IMPORTANT: Accessing the debug room could wipe or corrupt your save-data! You have been warned.
To start off, boot up the PAR/GG and use the following magic code: 7FEDF23F. Now continue the boot-up into the game and either load your save-data or start a new game. In the event of starting a new game or using an early save, you may want to stick a Flammie Drum in your inventory with the following code: 7E2E9701. Make sure you move it into your Ring Menu, since it will appear in the backup inventory.
Now, call flammie and head toward the south-eastern part of the map, off the coast of Navarre. You’ll see there a small white square in the middle of the ocean (see figure a), shimmering in the morning light. Have Flammie land here, and you will find yourself in Debug Room 1!
Debug Room 1
The first question you’ll be asked is whether you want the X/Y coordinates to display (not tremendously useful) and whether you want to save, so make your choice. Now you will see the screen displayed in figure b. Each little green square will transport you to a location, as listed below (letters indicate the column, numbers the row, just like an Excel Speadsheet), or you can talk to one of the characters at the bottom of the screen. The bottom row of brown tiles and the sign in the top right-hand corner of the screen will take you to Debug Room 2, which we’ll discuss later.

fig.b
If you talk to the Byzel Dancer in the centre of the screen… well, she’ll just look at you blankly. But if you talk to Mr. Moti, much joy is in store. The one on the left will give you a Music Test with a whole heap of tunes and sound-effects (and I suggest you talk to him quickly now and stop that constant loop of Closed Garden); use A to select a track, or B to move to the next page of choices.
The Mr. Moti on the right will display the ending of the game in accordance to the characters that you have in your party (Note: if you only have one or two characters in your party, the ending scenes for the remainder of the characters you chose will still display, but their sprites will be invisible), including the credits.
There is also a Mana Goddess Statue at the top of the screen, which will allow you to save your game. Just below her is another green patch of grass. This leads to an open space known only as “Miyagawa Test”, where you will find a lot of nothing and a single Rabite. If you walk up to it and press A, then walk away a certain distance, it will sound Victory. That’s it, there is nought else.
Each time you exit and re-enter Debug Room 1 you will get one of three variations. The first is this one described, the second and third have no characters or statue, but instead display the main character portraits (as seen in the Menu) at the top of the screen using the default pallete. If you press A standing in front of them you can cycle through the different classes, always using the default pallete though (Riesz’s Fenrir Knight with a pink wolf… priceless!).
|
List of locations for Debug Room 1 |
|||||
|
A1: Castle City Jadd |
A2: Cave of Waterfalls |
A3: Flowergarden Land Diorre |
|||
|
A4: Volcano Island Bucca |
A5: Mirage Palace (end of) |
||||
For a complete list of the tracks available in the Mr. Moti’s Music Test, see the end of this page (since they are listed in the test itself, it’s best to get on with more important matters first, but the list will tell you what each track is).
Debug Room 2
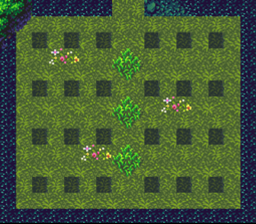
fig.c
Debug Room 2 allows you to access any bosses that you haven’t already defeated in the game, as well as one or two that will be available even if you have defeated them (Jewel Eater and Full Metal Hagger, for example). Again, the tile targets are listed below with letter for column, number for row. The trigger point for the tiles on this screen is slightly above the tile itself for whatever reason. Exiting from this screen upward will take you back to Debug Room 1, and most bosses, once defeated, will lead you back to this room on exiting, but not all, so you may need to travel to the white square again.
Also there are a couple that lead to non-boss locations, and one that leads to Debug Room 3. Note: There is no way back from Debug Room 3 after you have entered it (aside Flammie, that is)!
Another interesting occurence is the fight against Gorva. Unlike in the game, where you lose one member of your party prior to the fight (DIEDIEDIEDIEDIEDIEDIEDIEDIE!), you’ll be fighting him with your entire crew, and when defeated, a fourth character (which may default to Duran in his first class) will appear briefly and shout that they’re alright, then disappear. Also, if you chose to fight Genova, and have already defeated him, you can go outside and explore Rolante Castle, with Riesz fainted just outside the room where you fight him. She will talk to you, even if you have Riesz on your party.
|
List of locations for Debug Room 2 |
|
|
A1: Xan Bie (lower HP ver.) |
A2: Land Umber |
|
A3: Dolan |
A4: Dragon Emperor |
Debug Room 3

fig.d
Very similar to the second room, but darker, this contains the remainder of bosses, and also a couple of enemies in a sparring room or armoury of some sorts. As mentioned before, this room offers no exit. Exiting the room upward will lead you to the Mana Stone of Darkness and the fight with Zable Fahr, as will every tile after the ones listed (so only the first row and the second up to the fourth contain anything unique).
Also regarding the Sparring Room, you can exit by going downward (it’s not particularily obvious, so I thought I should clarify). Another curious point to mention is that not always does the music change trigger for the bosses (you would not believe how ludicrously funny it is trying to fight Zable Fahr with I’m a Flamelet playing), which is another good reason to change your tune from Closed Garden really.
|
List of locations for Debug Room 3 |
|
|
A1: Koren (fight against dragons) |
A2: Werewolf (Sparring) |
The Mr. Moti Music Test
Here are listed the tracks you can choose from in Mr. Moti’s Music Test in Debug Room 1. I’d recommend not trying SErole, since it keeps building and could make your ears bleed. I have listed the trackname that each one corresponds to on the Soundtrack.
Note: The spellings and numeric values are as they list in the game, including mistakes.
|
00: STOP – Stops the Music 01: Air2 – Whiz Kid 02: Beasts – Left-handed Wolf 03: Navarre – Raven 04: Delicate – Witchmakers 05: Wendel – Evening Star 06: Rolante – Female Turbulence |
07: Evil – Three of Darkside 08: Town – Ordinary People 09: Palace – Ancient Dolphin 0a: Danger – Political Pressure 0b: Flagile – Few Paths Forbidden 0c: Day – Little Sweet Cafe 0d: Highland – Swivel |
0e: Ank – Harvest November 0f: Jad – Walls and Steels 10: Wood – Powell 11: Jungles – Damn Damn Drum 12: Flower – Don’t Hunt the Fairy 13: Snowfall – Another Winter 14: Mountain – Different Road |
|
15: Dragons – Weird Counterpoint 16: Mille – Electric Talk 17: Fantagen – Hope Isolation Pray 18: Minaton – Intolerance 19: Chime2 – Fable 1a: Remember – Innocent Sea 1b: LoveLove – Delicate Affection |
1c: Pilots – Meridian Child 1d: Rose2 – Nuclear Fusion 1e: Riddle – Sacrifice, Part 3 1f: Gazer – Strange Medicine 20: ZanBie – Obsession 21: Landumbr – Rolling Cradle 22: Griffon – High Tension Wire |
23: Eyes – Faith Total Machine 24: Zable – Secret of Mana 25: Dran – Black Soup 26: Nurd – Frenzy 27: Angel – Innocent Water 28: Fright – Can You Fly, Sister? 29: Boosca – Splash Hop |
|
2a: Menu – Closed Garden 2b: Opening – Where Angels Fear… 2c: Ending – Farewell Song 2d: Win – Positive 2e: Get – And Other 2f: Dead – Long Goodbye 30: March – Axe Bring Storm |
31: Pedan – Last Audience 32: Wind – Wind Sound Effect 33: Flamelet – Oh I’m a Flamelet 34: SEdulan – Heartbeat/Breathing 35: SEdool – Heartbeat/Boat Horn 36: SErole – Cannon Drumroll 37: SEbom – Cannon Boom |
38: SEflammy – Flammie! 39: Home – Person’s Die 3a: MANA – Angel’s Fear 3b: Go – Religion Thunder 3c: Never2 – Sacrifice, Part 2 3d: Sleep – Sleep Fanfare 3e: Pilots2 – Meridian Child |
|
3f: Turnback – Reincarnation 40: Bells – Decision Bell 41: Level – Gain Level Fanfare 42: Catch – Not Awaken 43: Fortune2 – Sacrifice, Part 3 44: Pihyara – Pihyara Flute Fanfare 46: Ending2 – Breezin |
||
And there you have it, that is what you will find in SD3’s rather complete Debug Room. Hope you enjoy tinkering with it, just remember the risk mentioned (you’ll probably be safe as long as you don’t save, but if you can have a save clean to use with it all the better, or if you can make a flash backup). Have fun!


